DIY Motion-Activated Relay Control using Arduino
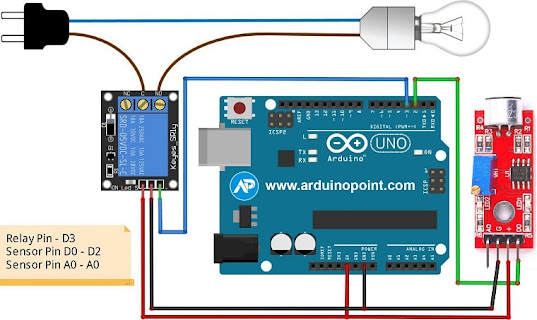
Introduction Have you ever wanted to create a simple motion-activated project using Arduino? In this tutorial, we'll guide you through building a motion-activated relay control system using a Passive Infrared (PIR) sensor and an Arduino board. This project is perfect for beginners and provides a hands-on introduction to working with sensors and actuators. Components Needed Arduino board (e.g., Arduino Uno) Passive Infrared (PIR) sensor Relay module Jumper wires Breadboard Wiring the Components First, let's set up the hardware. Connect the PIR sensor and relay module to the Arduino as follows: PIR sensor: Connect the sensor's VCC pin to 5V on the Arduino. Connect the GND pin to GND on the Arduino. Connect the OUT pin to digital pin 5 on the Arduino. Relay module: Connect the VCC pin to 5V on the Arduino. Connect the GND pin to GND on the Arduino. Connect the IN or signal pin to digital pin 6 on the Arduino. Ensure that your connections are secure and double-check the speci...
.jpeg)