
Introduction
Securing your home or workspace is a top priority, and with the power of Arduino, creating a custom door lock security system becomes an exciting and achievable project. In this guide, we'll explore how to build a Door Lock Security System using an Arduino Uno, a 4x4 Keypad, and a Servo Motor.
Components Needed
- Arduino Uno
- 4x4 Keypad
- Servo Motor
- Jumper Wires
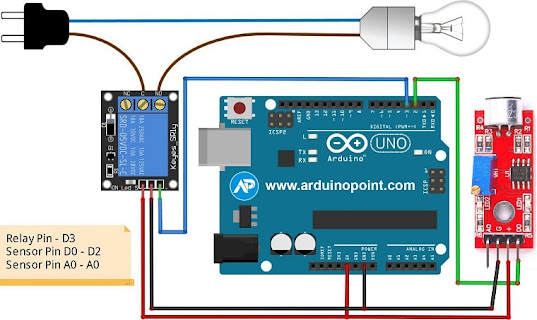
Circuit Connections
- Connect the keypad to the Arduino Uno using jumper wires, ensuring correct connections for rows and columns.
- Connect the servo motor to the Arduino, with the signal wire to a digital pin, power wire to 5V, and ground wire to GND.
Code Explanation
The provided Arduino code uses the Keypad library to read input from the 4x4 keypad. A servo motor is employed to simulate a door lock mechanism. When the '#' key is pressed, it toggles the door lock state between locked and unlocked.
Note: It is essential to have the Keypad and Servo libraries installed in the Arduino IDE. Pin numbers and servo positions should be adjusted based on actual hardware connections.
Arduino Code:
// Include necessary libraries
#include <Keypad.h>
#include <Servo.h>
// Define keypad layout
const int ROWS = 4;
const int COLS = 4;
char keys[ROWS][COLS] = {
{'1','2','3','A'},
{'4','5','6','B'},
{'7','8','9','C'},
{'*','0','#','D'}
};
// Define keypad pin connections
byte rowPins[ROWS] = {9, 8, 7, 6};
byte colPins[COLS] = {5, 4, 3, 2};
// Create Keypad and Servo objects
Keypad keypad = Keypad(makeKeymap(keys), rowPins, colPins, ROWS, COLS);
Servo doorLock;
// Define servo positions
const int unlockPosition = 90;
const int lockPosition = 0;
bool doorLocked = true; // Initial door state
void setup() {
// Attach the servo to pin 10
doorLock.attach(10);
Serial.begin(9600);
}
void loop() {
char key = keypad.getKey();
if (key) {
Serial.println(key);
if (key == '#') {
if (doorLocked) {
unlockDoor();
} else {
lockDoor();
}
}
}
}
void unlockDoor() {
doorLock.write(unlockPosition);
delay(1000); // Delay to ensure the servo has enough time to move
doorLocked = false;
Serial.println("Door Unlocked");
}
void lockDoor() {
doorLock.write(lockPosition);
delay(1000); // Delay to ensure the servo has enough time to move
doorLocked = true;
Serial.println("Door Locked");
}
Additional Considerations
Password Protection:
- Enhance security by implementing a password system instead of a single '#' key press.
- Utilize a secure algorithm for password validation.
Multiple User Support:
- Consider expanding the system to support multiple users with unique access codes.
Encrypted Communication:
- For advanced security, explore options for encrypted communication between the keypad and Arduino.
Conclusion
Congratulations! You've successfully created a DIY Door Lock Security System using Arduino and a keypad. As you explore further, consider additional security features and encryption methods to tailor the system to your specific needs.
Stay tuned for more exciting Arduino projects and security system guides in our DIY series!

.jpeg)
Comments
Post a Comment